Table of contents
If "how to change the shower resistance" was an extremely difficult question to imagine as a task for yourself to accomplish, stop everything you are doing! There is nothing worse than, after a tiring day at work, coming home, running to the shower and... no warm water to relax your body and mind.
For the first case, it is necessary to hire a professional, such as an electrician, to solve this issue that is a little more complex. For the second case, the solution is simple and practical, and there is no way around it... The only way out is to change the resistance for a new one.new to get a little time of relaxation and pleasure in the warm or hot bath.
How to change the shower resistance
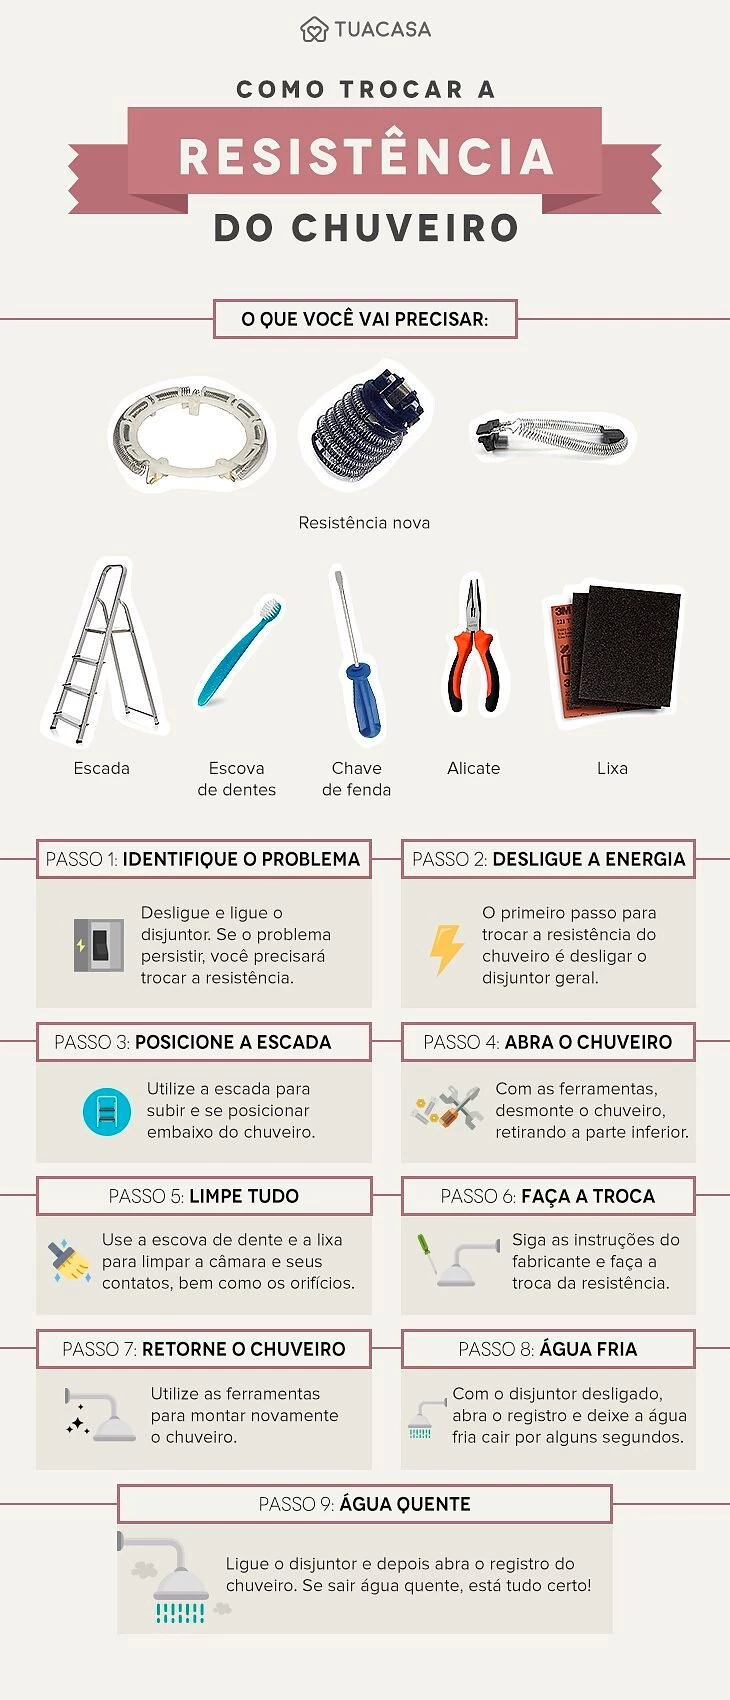
Step 1: Identify the problem
If when you turn on the shower, the water doesn't get hot, turn off and turn on the circuit breaker. If the problem persists and the water doesn't get hot again, there is no way out. Run to a specific store and buy a new resistance for your shower, according to the specifications of the part, such as model, voltage and brand.
Step 2: Turn off the power
No accidents such as electric shocks or falls. Therefore, the first safety measure when changing the shower resistance is to turn off the master switch and make sure to dry the bathroom floor, and wear shoes with rubber soles.
See_also: 30 sun mirror models to decorate and light up the environmentStep 3: Position the ladder
Use the ladder or stool to climb up and position yourself under the shower to get the shower open. Don't forget to make sure the floor is really dry, to avoid possible slips!
Step 4: Open the shower
With a screwdriver, disassemble the shower head by removing the bottom part, called the spreader, and be careful with the rubber between the chamber and the cover to avoid future leaks. And get down from the ladder! If the resistance is really burned, you will notice the break in the spiral, as well as the burn marks.
Step 5: Clean up
If necessary, before replacing it with the new heating element, use a toothbrush and sandpaper to clean the chamber and its contacts, as well as the holes.
Step 6: Make the change
It is always a good idea to follow the manufacturer's instructions when replacing the new one, but just check the position of the burned resistor and put the new one in the same way. It is even worth taking a picture to follow the same steps.
Step 7: Return the shower
Now use the screwdriver again to reassemble the shower head with the chamber, cover, and spray head.
Step 8: Cold water
With everything ready, do a simple test. Still with the breaker off, open the shower and let the cold water fall for a few minutes. The process is important to check for leaks and prevent the new resistance from burning out.
Step 9: Hot water
Then, turn the main switch back on and test the shower again, now heated. If there is warm water, then everything is fine!
Finding the Problem
Only showers that are electric or hybrid - that which mixes electric and solar energy - have a resistance. The resistance is a small metallic part located internally and practically responsible for the total operation of the shower. In other words, an extremely important part for your baths and that long-awaited relaxation at the end of the day, right?
For your better understanding, the resistor basically works as follows: when you turn on the shower, the electric current runs through the whole appliance to the resistor and heats it up. With that, the water also follows the same path, including passing through the already heated resistor - and also raises its own temperature. That's when the water gets hot or warm, depending on the temperature leveldesired.
See_also: Graduation cake: 95 inspirations for your partyThe shower usually has two specific modes so that the water has the ideal temperature, without harming us. In the "winter" mode, for example, the water is much warmer, while in the "summer" mode, as it passes over a larger internal area, the water remains less heated, providing a more pleasant shower for your well-being - and your skin thanks you!
What causes a shower heater to burn out?
But you must be wondering why the resistance burns out, right? Well, there are a few reasons that can explain this annoying little problem, besides, of course, the useful life of your electric shower itself. Among the causes of this little problem are
- - Baths that are too hot and too long;
- - Problems with electrical circuit breakers;
- - The voltage at your house may not be the same as the voltage at the showerhead;
- - The shower overload, due to low pressure;
- - Wiring problems in your bathroom.
If any of these signs appear, you can already be smart about changing the resistance of the shower in your house. This is usually a practical and quick domestic problem to be solved, without the need to call for help or pay for a professional to change the resistance. Except in the case of a bigger problem, such as the electrical network, as we have already mentioned here. In this case, the helpprofessional is more than recommended, it is necessary!
Simple and easy to perform task
Believe me, changing the shower resistance is one of the simplest tasks and does not put your safety at risk. To do so, all you have to do is identify that the part is really burned out and follow very quick steps to put a new part in place. However, remember: buy the right resistance for the model, voltage and brand of your shower. Usually, this information is identified on theproduct or can be clarified by a simple conversation with a salesperson who specializes in the subject.
The new resistor must, necessarily, be compatible with the model and voltage of your electric shower, otherwise, even if you perform the new installation correctly, the operation of the device will be compromised, besides causing you to spend money for nothing on the purchase. Be careful with the product and also check the quality of the part. Specialized stores in products such asthat can ensure that you buy the right piece.