Table of contents
Composting at home is very important because you can produce compost by reusing organic waste that would otherwise be thrown away. The home compost bin is highly recommended for this process: you don't need to spend a lot of money to create one, and you can customize it for your environment. Check out, now, tutorials on how to create your own!
See_also: How to make an air freshener to make your home fragrant1. how to make a home compost bin
- First, gather 3 buckets of vegetable fat with a lid, sawdust, flange, and a faucet. Then, separate the tools that will be used: drill, cup saw, scissors, saw knife, pen, and wood drill bits;
- Next, cut the tops off the buckets so that one fits into the other. Mark with a pen where the cut will be made on the tops of each bucket, and then make a hole with a drill to make the cut easier. Remember that the top of the bucket that will be on top should not be cut off;
- After cutting the lids with a saw knife or scissors, drill holes in the bottom of all the buckets except the collector (the one that will be underneath the other buckets). Use a cut-out lid to mark the area where the holes should be drilled;
- Drill several holes in the marked area;
- Also drill small holes in the top sides of the buckets (except for the collector), to improve the oxygenation of the compost bin;
- Take the collecting bucket and use the flange as a template to mark the hole on the bottom side of the piece, where the faucet will be placed;
- Drill a hole in the area with the drill and open it with the cup saw;
- Fit the flange into the hole and then install the faucet;
- Stack the buckets, remembering to leave the collector underneath and, on top, the bucket with the full lid;
- Then, just put the organic waste in the top bucket and cover it with a small layer of sawdust;
- When that first bucket is full, switch positions and replace the lid with the empty bucket in the middle.
The home compost bin is affordable, practical, and easy to make. In the video, 3 15-liter buckets are used, but this measurement can be modified according to your organic waste production. In other words, you can use more or less buckets in your compost bin according to your needs.
2. creating a home compost bin with worms
- Separate 3 buckets with lids. Make holes in the sides of 2 buckets, so that air can get in and the worms don't die. The bucket that isn't drilled should be underneath the others;
- Then drill several holes in the bottom of these 2 buckets. Remember to make a pattern for these holes and follow it in the 2 buckets;
- Then cut the lid off the bucket that will be in the middle, so that the top one can be fitted into it, and a little bit into the other bucket. This way they will fit well together;
- Take the bucket that will be underneath the others and drill a hole in the side, to install the faucet;
- After installing the faucet, cut off the lid of this bucket. Leave a margin, because here the top bucket will only be fitted to the lid and should not go into the bucket underneath. Be careful that this margin does not cover the holes in the bottom of the bucket that will be on top;
- Place a screen or a piece of TNT paper underneath the cut lid. This paper will serve as a filter so that the residues don't fall into the last bucket;
- In the middle bucket, place 2 fingers of soil and the California earthworms;
- On top of the soil, add peelings of vegetables and fruit (except citrus);
- Then add dry waste, such as newspaper and tree leaves and sawdust. Remember that for every portion of wet waste (bark), you must add two portions of dry waste;
- Cover this bucket with the lid that is full and leave only this bucket and the bucket with the tap stacked. When the bucket with the worms is full, place the third one between it and the last bucket. This way, the slurry will drain to the tap without interfering with other composting.
Also known as vermicomposting, worm composting is advantageous because it speeds up the process and produces worm humus, which is very good because it is rich in microorganisms and thus can provide better nutrition for the plants.
See_also: Learn how to make the ideal lamp calculation for a room3. small home compost bin
- Take a gallon of water;
- Drill holes in the bottom and lid of the gallon with a heated screwdriver. This way air will enter your compost bin;
- Next, make a cap on the side of the gallon. Remember that this cap must not detach completely from the gallon, i.e. you must cut off only 3 sides of the item. To do this, take a stylus, make a small cut, and continue cutting with scissors;
- Then add a layer of cardboard and crumpled newspaper to the gallon;
- Put a layer of regular soil on top, another of chopped corn cob, eggshells, and chopped fruit and vegetable peelings. Finally, make a layer of coffee grounds;
- Cover all these layers with soil;
- When you notice that the soil is very dry, add a little water, without soaking it;
- If necessary, add another layer of vegetables and another layer of soil.
This type of compost bin is great for those who don't have much space at home, but wish to compost at home.
4. step by step pet bottle compost bin
- First, make a hole in the cap of the bottle with a hot nail;
- Then cut off the bottom of the bottle with scissors;
- Cap the bottle, place it upside down on the table, and add sand to it (without the bottom);
- Then put two layers of soil and tuck it inside the bottle;
- Add a large layer of fruit peels, vegetables, and leaves;
- Cover the layers with a portion of soil;
- To avoid mosquitoes, cover the end of the bottle with a cloth;
- Finally, the bottom of the bottle that has been cut out should be placed under the bottle cap (which is upside down) to collect the slurry that will come out of the compost bin.
Another interesting option of a small compost bin for those who don't have much space is this one made of pet bottles. Besides not taking up much space, it is very affordable, since many people already have pet bottles at home.
5. how to make home compost on land
- Choose a part of your garden bed or soil to make the compost bin;
- Make a space in that part of the flowerbed/soil;
- Put the organic waste in this space. Do not add meat or cooked food: only fruit peels, vegetables and eggs;
- Cover the layer of waste with soil;
- If you have leaves from trees or plants in your yard, throw them on top of this soil to speed up the decomposition process;
- Remember to stir the compost once a week.
If you already have a garden bed or yard with soil at home, a great idea is to make this compost bin directly in the soil. One advantage of this model is that it is very simple and you can create it without spending anything:
6. creating a home compost bin with a drum
- To make this model, you will need a barrel, gravel, a faucet, 3 drains, a sieve, worms, and 1 cloth;
- First, drill a hole in the bottom of the side of the barrel and install the faucet;
- Drill a hole in two sides of the barrel and another in its lid. In these spaces, install the drains. This way, air will enter the compost bin;
- Then put gravel in the bottom of the barrel;
- Screw the sieve right into the center of the barrel;
- Then place a cloth over the sieve, to keep the worms and soil from going down;
- Inside the drum, add soil, the worms, and the organic waste;
- Add another layer of soil to the barrel and you're done!
For those who produce a lot of organic waste at home, it is important to have a large compost bin; in this case, a drum bin is usually an excellent option.
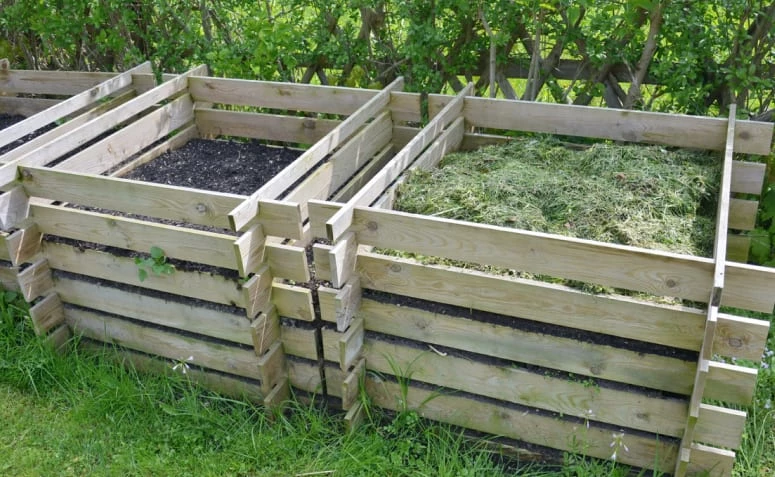
7. how to make a pallet home compost bin
- Disassemble your pallet with a hammer;
- Cut the base of the pallet in half, so that you can make the two parts of the compost bin. If you don't want to cut the wood, you can ask a carpenter to do this step;
- Place one half of the base in the place where you want to place your compost bin. This half will be the base of your piece;
- To make the sides of the composter, first nail strips of wood from the pallet into a rectangular shape, then nail more strips to fill this rectangle (like a bed frame);
- Do this process 5 times, to create 5 sides;
- Nail the sides to the base of the composter. Remember that two of the sides should be nailed in the middle of the base, to divide the two parts of the piece;
- Fill the front of the compost bin with wooden strips, without nailing them down. They should only fit into the sides, so that they can be removed;
- To use the compost bin, simply place organic waste and dried leaves in one part of the piece until it is full;
- At this point, you should start using the other half of the compost bin. To get the compost out of the first half, just remove the wooden strips that are attached to the front of the bin.
If you want to have a rustic compost bin at home, you can choose this wooden model, which is a bit more complex than the other tutorials on this list, but the result is amazing.
Which of these home compost bin models best suits your space and style? Think carefully about these items and your budget when choosing the type you will make. Then, all you have to do is get to work and start producing compost! If you want to know more about the subject, check out our composting tips.