Table of contents
Making a PET bottle pouf is a creative way to reuse bottles that would otherwise end up in the trash. Recycling these materials and turning them into decoration for your home is a good hobby, a way to increase your income - should you decide to sell them - and the environment thanks you! See below for great ideas and tutorials:
1. how to make a puff with 9 or 6 bottles
In this video, Juliana Passos, from the channel Casinha Secreta (Secret House), teaches how to make a square puff, with nine bottles, and a round one, with six bottles.
Materials
- 6 or 9 PET bottles with caps (depending on the desired format)
- Adhesive Tape
- Cardboard
- Enough acrylic blanket to cover the puff
- Plush and/or fabric of your choice
- Hot glue
- Scissors
- Tape or thread for finishing
Step by step
- With the bottles clean, put them together in three sets of three bottles, wrapping them with plenty of tape;
- Put the three sets together in a square and wrap all the bottles with the tape. Wrap the tape around the top, bottom, and middle of the bottles to make sure they are securely attached;
- Mark on the cardboard the size of the bottom and the top of the puff. Cut out the two parts and glue each one on one end, wrapping the whole puff with the tape vertically;
- Measure and cut out the acrylic blanket using the sides and top of the puff as a template;
- Glue the acrylic blanket seat of the puff to the top using the adhesive tape. Wrap the sides of the puff in the acrylic blanket and close with the adhesive tape;
- Cut a 50 x 50 cm piece of plush, place it on the seat, and sew all the way around to join it to the acrylic blanket;
- With the fabric of your choice, measure the side of the puff and wrap the entire area, using the hot glue. Also glue the remaining length of fabric to the base of the puff, and a square of felt or other fabric in the center for the finish;
- Thread a line or ribbon of your choice where the plush meets the fabric for a more delicate finish. Glue with hot glue.
It may seem difficult, but Juliana shows that it is not. The same steps happen for the puff made with 6 bottles, but this one must have the bottles arranged in a circle. Check it out:
2. simple and cute puff
In this video, from JL Tips & Tutorials, you learn how to make a beautiful and super-resistant puff:
Materials
- 24 PET grips with lid
- Adhesive Tape
- Cardboard
- Acrylic Blanket
- Thread and needle
- Fabric of your choice
- Hot glue
- Scissors
Step by step
- Cut the top off 12 bottles. Discard the top part and fit the rest over one of the whole bottles. Repeat the process;
- Gather the 12 finished bottles together in a circle and wrap them with plenty of tape. Using a string or rubber band to hold them in place can help you with this step;
- Cut the cardboard to the length needed to cover the side of the puff. Curling the cardboard like a snail makes it round and easier to apply to the frame. Tape the ends together;
- Cut a piece of cardboard to the size of the top and tape it down;
- Measure and cut enough of the acrylic blanket to cover the sides of the puff. Do the same for the top. Use tape to secure the ends of the length, then sew the blanket from top to side;
- For the cover, sew the fabric of your choice, based on the measurements of the top and side of the puff. You can do this by hand or by sewing machine;
- Cover the puff with the cover and glue the fabric remnant to the underside with hot glue.
- 7 PET bottles
- Adhesive Tape
- Cardboard
- White glue
- Newspaper
- Gray, black, pink and white paint
- Put the 7 bottles together, leaving one in the center, and tape the sides so that they are tightly held together;
- Cut the sheets of newspaper in half and glue them around the bottles, to make it rounder. Make 3 layers of paper and glue;
- Cut the cardboard to the size of the puff's seat (the bottom of the PET bottles) and glue it down with white glue;
- Cut smaller pieces of newspaper and cover the cardboard tightly using white glue. Do the same for the base of the puff;
- Put a good coat of glue all over the newspaper and let it dry;
- When dry, paint the entire puff with the gray paint and draw the elephant's face on the side.
- 18 PET bottles
- Assorted fabric scraps
- Cardboard Box
- Hot glue
- Needle and thread or sewing machine
- Tacker/pinch or pressure stapler
- Adhesive Tape
- 4 buttons
- Filling
- Cut off the end of 9 bottles and fit the whole bottles inside the cut ones, making sure that the spout of the whole bottles meets the bottom of the cut ones;
- Join 3 bottles together with the help of tape. Make two more sets of 3 bottles and then join the 9 bottles into a square. Wrap the sides with plenty of tape;
- Cut the flaps of the cardboard box opening and fit the square of bottles inside and secure with tape;
- Cut a square of cardboard the size of the box opening and tape it together;
- Cut 9 equal-sized scraps of the fabrics you prefer and sew them in rows of 3. Then join the 3 rows together: this will be the seat of the puff. For the sides, cut squares or rectangles of fabric and sew the rows together. The length of the rows can change, but the width should always be the same;
- Sew the sides to the seat, leaving one part open so that you can "dress" the puff;
- Fill the four buttons with pieces of fabric, using thread and needle to close them;
- Cut out the stuffing the size of the puff's seat and attach it to the patchwork cover, along with a piece of cardboard the same size. Turn the seat upside down and attach the buttons, with a thick needle, to the 4 corners of the central square. The needle should go through the cardboard. Tie a knot to secure each button;
- Cover the puff with the patchwork cover and sew the open end;
- Turn the remaining bar under the puff and secure it with a bobby pin or stapler.
- 14 PET bottles
- Adhesive Tape
- Cardboard
- Acrylic blanket and filling
- White and red fabric
- White Felt
- Hot glue
- Thread and needle
- Plastic feet for the base
- Cut the top off 7 bottles and fit the cut off part inside. Fit the cut off bottles to the top of the whole bottles. Tape the bottles together;
- Put the 7 bottles together in a circle and wrap them with tape until tight;
- Cut a piece of cardboard long enough and wide enough to wrap around the bottles and glue it with hot glue. Cut two cardboard circles, the size of the base and the seat of the puff. Glue them with hot glue and tape;
- Wrap the sides of the puff with the acrylic blanket, gluing it with hot glue;
- Cover the acrylic blanket with the white fabric and glue it with hot glue;
- Pass the thread and needle through the remaining fabric at the base of the puff and pull to pucker. Glue the support feet under the puff with hot glue;
- Cut two large circles from the red fabric and sew them together to make the seat cushion, leaving an open space to put the filling. Turn it inside out and glue the little balls cut out from the felt with hot glue. Fill the cushion with the filling and close it with thread and needle;
- Hot glue velcro to the seat, so the cushion can be removed for washing.
- 30 2-liter PET bottles
- 2 cardboard boxes
- 1 meter of acrylic blanket
- 1.70m of fabric
- 5 centimeters high foam
- Buttons
- Cord
- Hot glue
- Cut off the bottom 15 PET bottles and place the cut pieces over the top of the whole bottles. Place the bottles inside the cardboard box. Set aside;
- On the other cardboard box, glue with hot glue a piece of cardboard the exact size of the bottom, which will be the seat;
- Using the cardboard box, mark out and cut out the foam for the seat;
- Measure and cut the corino for the puff cover, leaving 1cm for sewing;
- Attach the acrylic blanket around the entire cardboard box with hot glue. Also glue the foam for the seat;
- Cover the box with the stitched cover. Mark the positions of the buttons on the seat and place them with a thick needle and string, using barbecue sticks for support;
- Glue the remaining corino bar underneath the box with hot glue. Finish the base by gluing a piece of fabric with hot glue.
- 38 2-liter PET bottles
- Cardboard: 2 circles of 50cm in diameter and a rectangle of 38cm x 1.60m
- Brown, green, red and yellow felt
- Adhesive Tape
- Hot glue
- Colored pens and fabric paint
- Foam
- Cut the top off half of the 38 bottles. Fit the cut off part into the body of the bottle, meeting the mouth and base. Then fit the whole PET bottle with cap into the cut off bottle;
- Make two sets of 2 bottles and wrap them with the tape. Add 3 bottles and do the same process. Place the 3 bottles in the center, with a set of 2 bottles on each side, and wrap them with the tape. Then, gather the rest of the PET bottles around these and wrap them with plenty of tape;
- Wrap the cardboard around its length, so that it can wrap around the bottles, and tape it;
- Cut out cardboard circles to enclose the frame, taping them to the top and bottom with tape;
- Glue the foam to the top of the puff with hot glue to form the seat;
- Make a triangular template with a rounded base and cut out 8 triangles from the felt. Sew the sides of the triangles together, forming the "bun" of the hamburger;
- Sew the top of the cover to the felt that will wrap around the puff, leaving an opening so that it can cover more easily.Sew;
- Glue the brown felt strip that will be the "hamburger" around the puff with hot glue, as well as the "lettuce", "tomatoes", "cheese" and "sauces" cut out of the felt to your liking. Fix everything with the help of hot glue;
- Use the colored pens and paints to make shadows and/or details on the "ingredients" of the sandwich.
Easy, right? See below the video with the step-by-step in detail:
3. elephant-shaped children's puff made of PET bottles
In this video, Karla Amadori shows how easy it is to create a cute puff for kids, and it's so easy that even the little ones can help with the production!
Materials
Step by step
The little ones will surely love it! See the details in the video:
4. puff from PET bottle and patchwork cover
This tutorial is amazing because, besides using plastic bottles and cardboard to make the puff, the cover is also made of fabric scraps. Perfect for those who don't want to throw anything away!
See_also: Room divider: 50 inspiring models to decorate your homeMaterials
Step by step
This one might take you a little more work, but the result is worth it:
5. mushroom puff
Paula Stephânia teaches, in her channel, how to make a cute mushroom-shaped puff from a PET bottle. The little ones will be delighted!
Materials
Step by step
Amazing, isn't it? In this video, you can also learn other great DIYs to do with the kids using PET bottles:
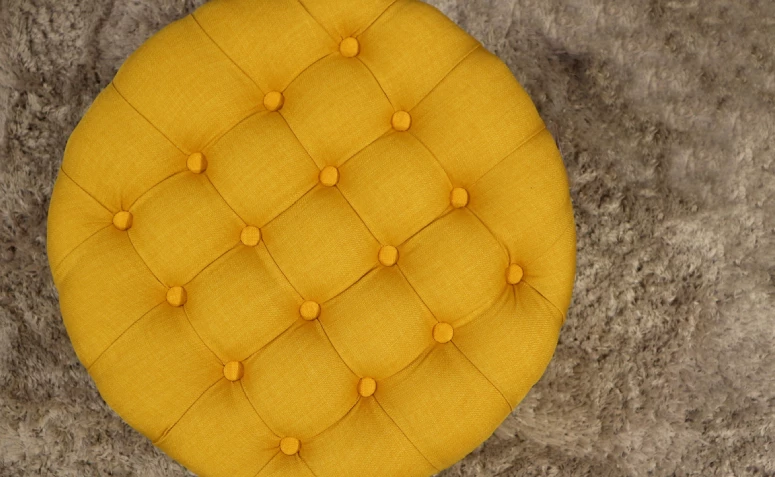
6. puff made of PET bottle and corino
This puff from JL Tips & Tutorials is so different that your visitors will hardly believe you made it out of PET bottles and cardboard.
Materials
Step by step
Isn't this a super nice and eco-friendly idea? Watch the video to follow the step-by-step:
7. hamburger-shaped puff from PET bottle
This hamburger-shaped pouf will look amazing in the decoration of the little ones' room. The children can even help in the production: it will be fun for the whole family!
Materials
Step by step
See the step-by-step instructions for this unusual puff here:
See how there is not just one type of PET bottle puff? Remember that the bottles need to be the same, and the more you use, the more weight the puff will support. See also PET bottle craft ideas for reusing PET bottles to reuse these items.
See_also: 70 Washbasin mirror ideas that transform the environment